Are you looking to upgrade your garage floor and make it look like a showroom? Epoxy coating is the perfect way to do just that. Applying an epoxy coating to your garage floor can transform it from dull and drab to sleek and stylish, all while protecting it from everyday wear and tear.
Introduction to Epoxy Garage Flooring
Epoxy is a type of resin that, when mixed with a hardener, creates a tough and protective coating. This coating not only enhances the overall appearance of your garage floor but also offers a long-lasting solution to common issues such as oil stains, grease, and foot traffic.
Benefits of Epoxy Garage Floors
Epoxy garage floors offer a multitude of benefits that make them an ideal choice for homeowners and car enthusiasts alike. One of the major advantages of epoxy flooring is its exceptional durability. This tough and protective coating is resistant to stains, chemicals, and abrasion, making it a long-lasting solution for high-traffic areas like garages.
Epoxy flooring is also incredibly convenient to clean. The smooth and glossy surface allows resistance to grime, allowing for hassle-free maintenance. Simply sweep or mop the floor, and any spills or stains can be easily wiped away.
Not only does epoxy enhance the functionality of your garage, but it also improves its aesthetics. With a wide range of color choices and the option to incorporate color flakes, you can customize your garage floor to complement your style and preferences. The glossy finish creates a sleek and professional look that will impress visitors and add value to your property.
Furthermore, epoxy flooring provides protection for the underlying concrete surface. It seals and shields the concrete, preventing damage from oil stains, moisture, and other contaminants. This not only extends the lifespan of your garage floor but also helps to maintain a clean and safe environment.
Preparing for the Epoxy Coating
Preparing the garage floor before applying an epoxy coating is crucial for achieving a long-lasting and durable finish.
Step 1: Clean the Surface
Start by thoroughly cleaning the entire floor surface. Remove any loose debris, dirt, and grease using a broom or vacuum. Next, wash the floor with a mild detergent and water solution. For stubborn stains and grease spots, use a degreaser or muriatic acid in accordance with the manufacturer's instructions. Rinse the floor thoroughly and allow it to dry completely.
Step 2: Repair Cracks and Imperfections
Inspect the floor for any cracks, divots, or imperfections. Repair them using an appropriate filler or patching compound. Follow the manufacturer's instructions to properly apply and cure the repair material. Once the repairs are complete, carefully sand down any uneven areas to create a smooth and even surface.
Step 3: Ensure Proper Ventilation
Epoxy coatings emit strong fumes during application, so it's important to ensure proper ventilation in your garage. Open windows and doors, and use fans to improve airflow. Consider wearing a respirator mask and providing additional ventilation measures if necessary.
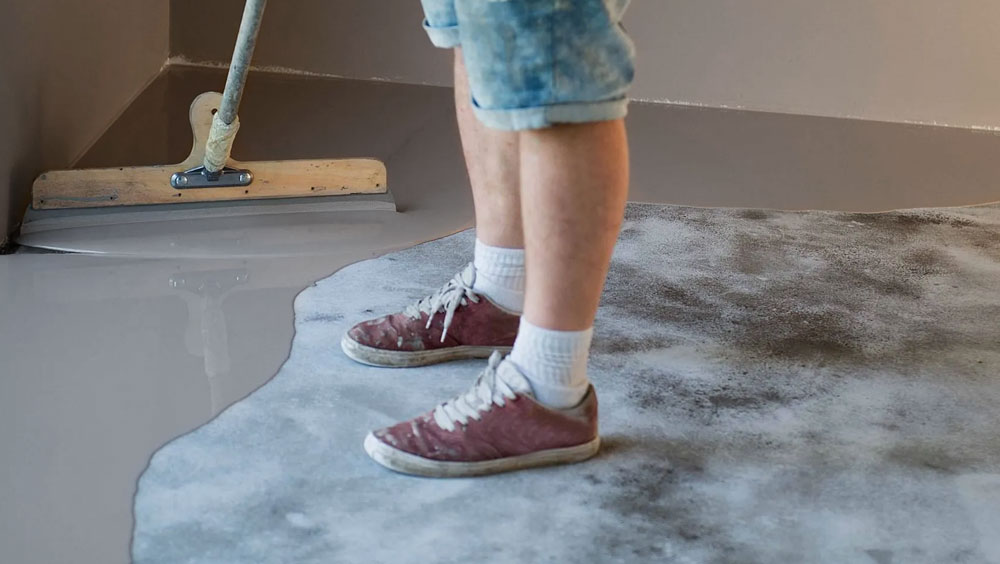
Applying Epoxy Coating
Applying an epoxy coating to your garage floor can transform it from a dull, stained surface to a durable and visually appealing space. Whether you're looking to create a showroom finish or simply want a floor that can withstand the wear and tear of everyday life, epoxy is an excellent choice. Here's a step-by-step guide on how to epoxy garage floor.
Choosing the Right Epoxy System
Choosing the right epoxy system for your garage floor is crucial for a durable and long-lasting finish. There are two main types of epoxy systems available: water-based epoxy and solvent-based epoxy.
Water-based epoxy is a popular choice for DIY enthusiasts due to its ease of use and environmental friendliness. It is water-soluble, which makes it easier to clean up and less toxic compared to solvent-based epoxy. Water-based epoxy also has a shorter drying time, allowing for faster installation.
Solvent-based epoxy, on the other hand, is known for its durability and resistance to chemicals and stains. It is ideal for garage floors with heavy foot traffic or exposure to oil and grease. Solvent-based epoxy provides a strong and durable finish that can withstand harsh conditions.
Step-by-Step Application Process
Applying an epoxy coating to your garage floor can enhance its durability, appearance, and resistance to oil stains and chemical spills. Here's a step-by-step guide on how to epoxy your garage floor:
Surface Preparation: Start by cleaning your garage floor thoroughly. Remove any dirt, oil stains, or grease using a degreaser or muriatic acid. Rinse the floor with water and let it dry completely.
Primer Application: Apply a coat of epoxy primer to the concrete surface using a paintbrush or roller. This will help the epoxy bond to the concrete better and provide better adhesion.
Epoxy Mixing: Mix the epoxy resin and hardener according to the manufacturer's instructions. Use a clean bucket and stir them together thoroughly. Avoid shaking the containers as it can create air bubbles.
Application: Pour the mixed epoxy onto the floor in a ribbon-like pattern. Use a paint roller or squeegee to spread the epoxy evenly, working in small sections. Make sure to cover the entire floor surface, including any edges or corners.
Color Flakes (optional): If desired, sprinkle color flakes onto the wet epoxy surface. This will add texture and visual interest to your garage floor. Let the epoxy cure for a few hours or as directed by the manufacturer.
Topcoat: Apply a clear topcoat to the epoxy surface for added protection and shine. This will also help to seal in the color flakes if used. Use a paint roller or brush to apply an even coat, making sure to follow the manufacturer's instructions regarding drying times between coats.
Remember to wear protective gear such as rubber gloves and goggles while working with epoxy, as it can cause skin and eye irritation. Additionally, consider the temperature and humidity conditions during the application process, as they can affect the drying and curing times.
Adding Decorative Elements (Optional)
Adding colored flakes not only adds visual interest but also helps to disguise any imperfections in the concrete floor. The flakes create a textured finish that provides traction and prevents slips, making your garage safer to walk on. They also help to hide dust and other debris that may accumulate between cleanings.
If you prefer a more sleek and modern look, metallic pigments can be used instead. These pigments create a glossy and reflective surface that gives your garage a high-end and polished appearance. Metallic pigments come in various colors and can be combined to create unique and eye-catching effects.
Curing and Maintenance
Once you have applied the epoxy coating to your garage floor and added any desired decorative elements, such as colored flakes or metallic pigments, it is important to properly cure and maintain your newly transformed space. Proper curing and maintenance will ensure that your epoxy garage floor remains in pristine condition and continues to provide a durable and attractive surface for years to come.
Curing Time and Usage Restrictions
Most epoxy coatings require a minimum of 24 to 48 hours to cure before allowing any foot traffic on the surface. It is important to follow the manufacturer's instructions regarding curing times to achieve the best results. The curing time may vary depending on factors such as temperature, humidity, and the specific type of epoxy used.
During the curing process, it is essential to avoid driving vehicles onto the freshly coated surface. The weight and movement of vehicles can disrupt the curing process and potentially damage the epoxy. It is best to park vehicles outside the garage or find alternative parking arrangements during the curing period.
Routine Maintenance Tips
Once you have installed an epoxy coating on your garage floor, it is essential to follow a regular maintenance routine to preserve its beauty and durability. Here are some tips to help you keep your epoxy floor looking its best:
Regular Cleaning: Sweeping or dust mopping your epoxy floor regularly is crucial to remove dirt and debris. This simple step helps prevent scratches and keeps your floor looking clean.
Avoid Abrasive Cleaning Agents: Harsh chemicals and abrasive cleaning agents can damage the epoxy surface. Stick to mild, non-abrasive cleaners and follow the manufacturer's recommendations.
Address Spills and Stains Promptly: If any spills or stains occur on your epoxy floor, clean them up immediately using a soft cloth or mop. Leaving spills or stains on the surface for an extended period can lead to permanent discoloration.
Use Mats and Rugs: Place mats or rugs at entrances and high-traffic areas to protect the epoxy surface from dirt and debris. These mats can also help prevent scratches caused by grit or small rocks that may get stuck in shoes.
Avoid Heavy Impact: While epoxy floors are durable, they can still be damaged by heavy impacts. Avoid dropping heavy objects directly onto the floor and use furniture pads or coasters to prevent scratches and dents.
Conclusion
In conclusion, epoxy garage flooring offers a wide range of benefits for homeowners looking to enhance the appearance and functionality of their garage. By following proper preparation and application techniques, considering decorative options such as color flakes or a variety of color choices, and adhering to curing and maintenance guidelines, you can enjoy a durable and visually appealing garage floor for years to come.
Frequently Asked Questions:
Can I apply an epoxy coating to an old garage floor?
Yes, you can apply an epoxy coating to old concrete floors. However, it is important to properly prepare the surface by thoroughly cleaning and etching it to ensure proper adhesion. This may involve using a degreaser, muriatic acid, or other etching solutions to remove any grease stains or contaminants.
How long does it take to complete an epoxy garage flooring project?
The installation time for a garage floor epoxy can vary depending on several factors, including the size of the garage and the condition of the existing floor. Typically, it takes about two to three days to complete the entire process, including the preparation, application of the epoxy, and drying/curing time.

Is epoxy flooring suitable for any climate or temperature?
Yes, epoxy garage floor coatings are suitable for various climate conditions and temperature ranges. However, it is important to choose the right type of epoxy for your specific climate. For colder climates, a water-based epoxy is recommended as it can withstand freeze-thaw cycles without cracking. In hotter climates, a solvent-based epoxy or a polyaspartic coating could be a better choice for its heat resistance.
Can I park vehicles on an epoxy garage floor?
Yes, epoxy garage floors are designed to withstand the weight and impact of vehicular traffic. Once properly cured, the epoxy coating forms a hard, durable surface that can withstand the weight of vehicles without damaging or cracking.
Can I install epoxy flooring over existing cracks or imperfections?
Epoxy flooring can help conceal minor cracks and imperfections in the concrete surface. However, it is important to note that larger cracks or significant damage should be repaired before applying epoxy. The epoxy may not be able to completely hide or fix major structural issues.